Wednesday, December 23, 2009

No Knead Bread is so very delicious!

a 326
This bread is almost effortless to make because it requires no kneading. Instead, the dough is allowed to slowly rise over a long period of time. Then it is baked in a preheated covered cast-iron pot, which helps produce a crispy, bakery-style crust on the finished loaf.

Ingredients:
3 cups all-purpose flour
1/4 tsp. active dry yeast
1 3/4 tsp. salt
2 tsp. chopped fresh rosemary
2 tsp. chopped lemon zest
1 1/2 cups water (cold tap is fine)
Cornmeal as needed

Directions:
In a large bowl, combine the flour, yeast, salt, rosemary and zest. Add 1 1/2 cups water and stir until blended; the dough will be shaggy and very sticky. Cover the bowl with plastic wrap. Let the dough rest at warm room temperature (about 70°F) until the surface is dotted with bubbles, 12 to 18 hours.

Place the dough on a lightly floured work surface. Sprinkle the dough with a little flour and fold the dough over onto itself once or twice. Cover loosely with plastic wrap and let rest for 15 minutes.

Using just enough flour to keep the dough from sticking to the work surface or your fingers, gently and quickly shape the dough into a ball. Generously coat a cotton towel, preferably a flour sack towel (not terry cloth), with cornmeal (I used flour). Put the dough, seam side down, on the towel and dust with more flour or cornmeal. Cover with another cotton towel and let rise until the dough is more than double in size and does not readily spring back when poked with a finger, about 2 hours.

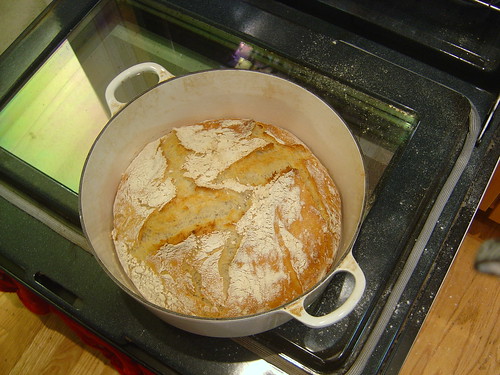
At least 30 minutes before the dough is ready, put a 2 3/4-quart cast-iron pot in the oven and preheat the oven to 450°F. I doubled this recipe and it fit well into my 8 quart Le Crueset.

Carefully remove the pot from the oven. Slide your hand under the towel and turn the dough over, seam side up, into the pot; it may look like a mess, but that is OK. Shake the pan once or twice if the dough is unevenly distributed; it will straighten out as it bakes. Cover with the lid and bake for 30 minutes. Uncover and continue baking until the loaf is browned, 15 to 30 minutes more.

Transfer the pot to a wire rack and let cool for 10 minutes. Using oven mitts, turn the pot on its side and gently turn the bread; it will release easily. Makes one 1 1/2-lb. loaf.

Adapted from Sullivan Street Bakery (New York City) and Mark Bittman, "The Secret of Great Bread: Let Time Do the Work," The New York Times, Nov. 8, 2006.

Tuesday, December 15, 2009

Peppermint Meringues with Dark Chocolate Ganache

Happy Christmas! Stripey Peppermint Meringues with a Dark Chocolate Ganache, oh yeah! I made these for the girls that like something fat free, or almost. It would have been fat free excepting the small bit of chocolate ganache filling these pointy hat sandwiches. Oh, they are so yummy! Three egg whites is only enough for about forty of these, and they're small so I'll have to make another batch. I had to use the big picture because they're small. a 013

Want a recipe? Here you go!

Stripey Peppermint Meringues

3 egg whites
3/4 cup sugar
1/2 teaspoon peppermint extract
red paste food coloring
piping bag
3/4 cup heavy cream
6 oz dark chocolate (that's half a bag of chocolate chips)

Preheat oven to 250F. Mix the egg whites with the sugar over a bain marie until you reach the ribbon stage. Ribbon stage is when it looks more opaque than translucent and also there is no granular texture, and it's kind of ribbon looking when you sway the whisk. Drop a bit on your finger and test it. Don't stick your finger in there, it's just a little yucky to do that. Remember darlings, I'm still a biologist! Then mix using wire whipping attachment until cooled. Add in peppermint extract. Using a piping bag and a star tip, paint the inside of the bag with red paste food coloring. Pipe out 1 inch size meringues and put into the oven for 1 1/2 hours, then turn off oven and leave it until it's completely cool. You can make the ganache and leave it all until the next day. No, seriously, leave it! It takes forever for it to set and will just drive you mad. Fill another piping bag with ganache and a round tip, pipe a little ganache on the flat side of a meringue and then press a second one onto it. Let them sit a bit to set and munch away!
Oh, yeah, it makes about 40 sandwiched pointy hats, you know, because you need two of them.

Irish smoked salmon chopped salad

Michael's cousins Breda and Anne made this salad when I first went to Ireland back in 1998. I still love it, and you'll see it in Cork but I never saw it on a menu in the North. Maybe it's a Cork thing, I don't know. a 003

Irish Smoked Salmon Chopped Salad

Red onion
Scallions (green onions)
Romaine lettuce (or whatever kind you like)
2 roma tomatoes
smoked salmon (Lox)
avocado
2 teaspoons of mayonnaise
salt
white pepper

Chop up all the ingredients to equal sizes, about a quarter inch put into a big bowl and then add the mayonnaise, salt and white pepper to taste. It's good if the lettuce is a little wet from rinsing as it lightens up the mayonnaise. It's so good!

Breda and Anne didn't use avocado, but I live in California, so it's ubiquitous and I love it.

Tuesday, December 8, 2009

Christmas Chocolate Walnut Toffee!

Beth came over last night to knit and I made Chocolate Covered Walnut Toffee!

So here's the thing about making toffee. You really have to whisk it! You're creating an emulsion with the butter and molten sugar, and it won't get there if you aren't working hard to mix it well with a whisk. I tempered the chocolate, and that is very lovely and delicious Lindt semisweet baking chocolate. I didn't toast the walnuts but next time I think I will. Even though it's absolutely freezing here these days I was impatient to wait for four hours and put the whole thing in the refrigerator overnight. In the morning I flipped it and broke it up.
Foamy stage
a 068
it's toffee!
a 070
Toffee poured into the pan
a 072
Walnuts before I chopped them up
a 073
Tempered chocolate
a 074
Spreading the chocolate
a 080
Here's the toffee before it went into the fridge.
a 082
Chocolate Walnut Toffee for Christmas!
a 084

Saturday, December 5, 2009

Apple Croissant Pudding


I made an Apple Croissant Pudding tonight. I was thinking did I want a chocolate one or an apple one, and decided for apple. More fiber! So it's a health food. ;-)

Friday, December 4, 2009

Hats, because Baby it's Cold Outside!

It's that time of year when it gets freezing cold in San Francisco! Plus I love the song, "Baby it's Cold Outside". If only my sweet baby could sing, we could do a duet. Anyhow, I digress. I've been working on many projects at the same time.

Here's what I have and they're Christmas Presents. I seriously doubt anyone reads this blog but me, and maybe Beth and Jaye. And the hats are for other people, so I guess... I could say...who is getting what.. but NOOOOOOOO! You'll have to wait! I can't take chances on you messing up the Christymas!

But my camera battery is getting charged so I can't load any pictures up just yet.
a 004
a 005

Wednesday, November 18, 2009

Finished Yummy Gloves!

Here they are! I finished them last night.
DSC02633

Sunday, November 15, 2009

Yummy Gloves

These gloves are based on LindaK's Yummy Mummy Fingerless Gloves, a pattern I found on Ravelry. Many people have made these but only one altered them and she made mitens. I like dexterity so I am adding fingers to mine.
Here's the front
a 034
Front detail
a 036
Here's the back
a 038

Wednesday, August 19, 2009

Allyson's Watery Coachella

This top is called Coachella (from www.knitty.com) and it seemed so cool and soooo Allyson. I made it without taking any of her measurements and it fits perfectly! She looks so good in it too! I made the XS size with Berroco Suede, needle sizes 7 & 9. The design of this top uses a tube with bound off places for the arms. This creates a cowl-like neck and the racerback tee in the back. Ingenious! I made it three inches longer than the pattern indicates because she tends to wear her tops a little long. It's so sexy cute and I love the turquoise color. My dear sweet friend Allyson, her husband and their two dogs, Oscar and Lola have taken care of our little guy McCool when we go on vacation. We usually give people who watch our dog a little something after we come back. Well, she's told me that she won't watch him anymore if we keep giving her stuff. So, I didn't give her this for that (but really it kind of was), I gave it to her for her birthday (which was in April). All my longtime friends know I'm super lousy at remembering birthdays. You'll usually get something way after the actual date. I just gave it to her yesterday. It's August.
DSC02159 DSC02163 DSC02167 DSC02164
DSC02165

Mermaid Fabric!


I found this great Mermaid fabric at the new New Pieces in Oakland! I went there with Terri M. to get fabric for her batik quilt. She remembered I did a few of those years ago, and we went to increase her stash for the queen size quilt she's making. This fabric will be for the back of Sofia Romero's quilt. Now... I guess I'll have to get started on what the front will be. Hmm...

Tuesday, June 30, 2009

Red Tailed Hawk in Golden Gate Park

It's not that I haven't seen Red Tailed Hawks in Golden Gate Park. I've seen plenty of them, but they're usually very high up in the trees. This one was just sitting on a stump while McCool, Bailey and I were walking home. It was about 3:30pm, late afternoon, but plenty of sun and there he was. Just sitting there, see he is there in the center of the picture on a little stump. Didn't move, didn't seem to care that a human and two dogs were strolling by. I pulled out my Blackberry Storm and tried to get the camera working. Two cars drove by and still the hawk just sat there. Then he flew off, holding a small blackbird in his talons. He didn't go to a high branch, still a lower one, and began eating his prey. I tried to get some pictures, but the camera on these phones aren't that great. I need to remember to just bring my camera with me always. I thought about it before I left the house but decided against it. It would have gotten a much better picture. It was a sight to see that large bird spread its wings with prey in hand only ten feet from me.
image
image

Friday, June 12, 2009

All done! and one near done

Here's the Woody Scarf now blocked and finished! Yay! I'm almost done with the Drop Stitch Lace Tank that I'm making for ______. It's still pretty even though loaded with a systematic error. I was thinking I would maybe rip but decided again not to. It's still loverly.

a 384
a 385

Friday, June 5, 2009

Woody Scarf

This scarf is based on No. 28 Lace Shawl by Shirley Paden from Vogue Knitting Spring 2009. I chose this yarn from the Traveling Tin Box Swap on Ravelry. It's La Jolla, 100% Rayon spun into a nubby soft yarn. It looks like the color of brown leaves. I wanted to do something in that vein and chose this pattern. It's worked on 4mm Size 6 US needles. It will definitely require blocking, but I think I should finish it soon. LOVE it!

DSC01795
DSC01796
DSC01797

Friday, May 29, 2009

Whoopie Pies!

Made small Whoopie Pies for Memorial Day at my cousin's barbeque. I used the small Oxo scoop because last time I made these I used the medium scoop and they were enormous! Way too much of a commitment to eating a Whoopie Pie. These are just the right size! DSC01783

Wednesday, May 20, 2009

Bead Swap!


I posted a note on the "For the love of beads swap" group on Ravelry to see if anyone wanted to do a straight up trade for size 6/0 beads. One person responded and said she would give me beads but didn't want any back. Isn't that so sweetie? So I said, well, take a look at my blog, I also sew and could send you one of my reversible fabulosity bags or a zippered pouch or an eyeglass pouch. So she sent me beads and I sent her two RF bags and a little chocolate from San Francisco. Fun!

Jar & Knitty Swap!


There's a group on Ravelry called Canny Crafters. It's devoted to people who like to make jam, jellies, preserves, pickles, and anything else that can be home canned. I started a thread to see if anyone wanted to swap a jar of their homemade yummy something and something else knitting or crochet related. So there's three of us. Here's what I sent. The jar was actually a little different because I had already foodsavered it. So I took a picture of another jar.
The dots are jam labels (stickers) that I made with my dork machine (sticker maker). I have looked and looked, but it's hard to find 2 inch circular stickers. Paper Source doesn't have any, Avery doesn't make them that size. Avery! It's madness, but actually, I love my homemade 2 inch stickers. I used card stock that I had in my stash. Cut 2 inch circles and then ran them through my dork machine. It's fantastic! I have a little thingy to adapt my rotary cutter to do circles, but I have enough for now. I'll update this post when I receive my end of the swap.

Oooh! Here's the wonderful booty I got in the mail from Dina! She sent me beet relish, peach lavender spread, a knitted dishcloth with an apple on it, a neat scrubby knit round thing, a package of her favorite cookies in the whole world! The cookies are so cute, they're in the shape of leaves! Some lovely raspberry caramel Dove chocolate AND a dark 70% chocolate Lindt bar! Woo hoo! A ball of yarn, a needle gauge, some recipe cards (which I don't have and really needed). and a Sheep Pez! Isn't that fantastic? So cool. I'm also keeping the jars she gave me forever because I don't have anymore of the little quilted crystal ones, and the jar holding the beet relish is one I've never seen here in the City.
DSC01775
DSC01776
DSC01777DSC01778

Zippered Pouch for Mom


Oh! I forgot to add the zippered pouch that I made for Mom for Mother's Day 2009. The two bags for her shoes, and now she says they're too nice for shoes. Oh well. I just hope she uses them.

Lou Seal Knits!


Here's the bobblehead we're getting at the San Francisco Giants Stitch N Pitch game this year. Isn't it hilarious? I'm so excited about it. I just love it!!! It's the silliest thing I've seen in a long time.

Saturday, May 9, 2009

Tutorial: Reversible Fabulosity

Materials:
2 fat quarters of material 18" x 22"
thread
sewing machine (I used both my serger and my Bernina)
2 yards of cording

Method:
Each side of the bag will be constructed, then attached to each other, and cording added.
1. Bag Construction (you will make two of these)
Using one of the fabric fat quarters with right sides facing fold the fabric in half so that it is 18" x 11" sew up the side with 18".
Figure 1.
a 033

Now fold the fabric in half again, to find the midpoint where the first seam is now in the middle.
Figure 2.
a 030

Sew the bottom end
Figure 3.
a 037

Now, manipulate the bottom seam so it forms a triangle. Make sure it's perfectly pointed or the bottom of the bag won't sit straight.
Figure 4.
a 039
Detail:
a 041

Sew a seam here and repeat on the other side.
Figure 5.
a 042

Now you have one side of Reversible Fabulosity. Repeat these steps with the second piece of fabric.

2. Attaching the bags
Turn one bag so the right side is on the outside.
Figure 6.
a 044

Leave the other bag inside out, with all the seams showing on the outside.
Figure 7.
a 035

Put the right side out bag inside the bag with all the seams showing. Now right sides should be facing each other.
Figure 8.
a 048

Also make sure the seam on the back of the bag (the first seam sewn) is on the same side for both fabrics.
Figure 9.
a 055b
Find the midpoint of each side of the bag. That is, looking at the bag from the top, with the middle seam at 90 degrees, determine the location of zero and 180 degrees. Or looking at the bag from the front, flatten the bag and locate the sides (where the top turns and becomes the bottom). THEN place a pin a distance of 2-3 inches at the halfway point on both sides.
Sew on the INSIDE of the bag 1 1/2 inches from the edge from pin to pin, EXCEPT do not sew between the marked 2-3 inches on both sides. This empty place is for the drawstring and for turning the bag right side out. It's important to sew from the inside, it will give you a better finished seam.

Figure 10.
a 048

Turn the bag right side out from the opening. Be careful and go slow. Don't want to rip anything now!
Figure 11.
a 058
a 053

Now Press! It's important to press here, so that your casing for the drawstring is sewn properly.
Sew on the INSIDE of the bag all the way around using a 1 inch seam allowance. This is your completely lined casing for the drawstring.
Figure 12.
a 056

Feed the drawstring into the casing and knot it when it reaches the beginning. Repeat on the other side.
Figure 13. Side A.
a 061

Figure 14. Side B.
DSC01733